Site Links:
Arthur Witles
Who I am - Site info
Music Lost to History Archive
Horoscope Archive
Original Poetry
Pre-Blogger Archives
Stuff I Made
Vacation Photos
My coming of age story.
Programs I use for the site
Email me
Latest Humorous T-shirt Slogan:
"You Wish!"
This one has to be taken in context to be appreciated. The girl wearing this belly shirt was maybe 5'0" tall, with a muffin top going on, despite the fact that she was clearly in her third trimester of pregnancy. In addition she was wearing a thong that came up past her low-rise jeans and pushed her muffin top down over the edge to really emphasize the roll. I'm not in perfect shape so I don't expect that others should be, but when you are wearing that shirt, along with the rest of the outfit, you open yourself to scrutiny (and perhaps random looks of horror).
It's fun to hate:
The Soccer Moms who insist that they drive gas-guzzling SUV's for the safety of their children despite the fact that they are 6 times more likely to be in a rollover
accident than any other vehicle. It's like beating your child unconscious with the butt of your gun so that he will remain on the floor, thus making him less likely
to be hit by a random bullet coming through the front window.
When Shadowtwin reigns supreme:
There will be mandatory, passive birth control required to participate in any form of government assistance. If you can't afford to raise your child on your own we are here
to help you, but we must first make sure that your reproductive organs are adequately contained. If you don't like that policy all you have to do is support your kids your
damn self!
Vote Shadowtwin!
Your Horoscope:
 Sagitarius: 11/22-12/21
A typographical error in your Church's newsletter will lead to you performing sex acts on dozens of anonymous strangers in your pursuit of "oral highground."
 Capricorn: 12/22-1/19
The stars did recently tell your wife to "listen to her heart" regarding whether or not she should leave you. The stars did not intend for you to listen to her heart. But once you used that bonesaw on her sternum (not trusting the stethoscope which just responded with a cryptic thumping sound), we're pretty sure she made up her mind anyway.
 Aquarius: 1/20-2/18
The stars would like to apologize for stating in their last prophecy, "Be wary of the stranger you meet at beach this weekend. The stars aren't sure why, but they don't trust him." Through a cosmic hiccup, that information was supposed to be released this month. The August prophecy should have read, "A dark and handsome stranger will approach you on the beach, profess his love for you, and sweep you away for a jetset marriage. After which you will lead a long, happy, prosperous, healthy life as the Queen of a small island nation." We apologize for any inconvenience this error may have caused.
 Pisces: 2/19-3/20
Your new stopwatch will allow you to time how long you can hold your breath underwater down to the thousandth of a second. Unfortunately, poor planning will mean that you are not able to actually share the information with anyone.
 Aries: 3/21-4/19
Your innovative new device for beauticians to use while giving pedicures can be wildly successful and make you quite wealthy IF you change the name. Trust us, no one is going to buy a "Ped-O-File".
 Taurus: 4/20-5/20
Your Mother always told you to wear clean underwear just in case there was an accident and paramadics had to see them. But as you board that plane today, the stars want you to know that you needn't worry about it. The debris field will be more than 8 square miles, making it impossible to find most human remains. Not to mention that the ensuing fire burned so hot that it disintegrated not only all fabric, but most of the thin metals aboard as well.
 Gemini: 5/21-6/21
You just had to get that genital piercing, didn't you? The stars tried to warn you not to, but you went ahead and did it anyway... Now all your worst fears will come to bear when, at a campground this weekend, you run afoul of this guy:

 Cancer: 6/22-7/22
The less traveled by areas of the Grand Canyon's north rim offer some of the most breathtaking views of this natural wonder. You will soon find out they also include some of the worst footings and none of the handrails. They do, however, provide equally awe-inspiring, terminal velocity impacts.
 Leo: 7/23-8/22
The stars heard your pleas, begging for someone who you could share your love with and embrace for the rest of your life. If you are still single, throw your arms around the closest person to you at 3:44pm GMT on Dcember 9th -That'll be the one. Trust us, you won't have time to be picky...
 Virgo: 8/23-9/22
The stars have piled up most of your things on the front porch. You can stay at a friend's house, but you aren't coming back home until you admit what you did and apologize. The stars' Mother was right about you... (you must have really pissed them off; the stars were in tears while they told me this)
 Libra: 9/23-10/22
The stars have been doing a little thinking and a lot of math. The population of planet earth is roughly 6,796,590,704. That means that roughly 566,382,558 people share each astrological sign. About 18,620,796 have the same birthday. Based on average life expectancy as many as 248,277 people were born on the same day, in the same year, for every zodiac sign. How can one statement possibly predict the future of all of them? Ehh, fuck it. "A full moon while Venus is rising is an omen of good things to come."
 Scorpio: 10/23-11/21
They say you never know how you are going to react to a crisis. After a home invasion this weekend you will: You will scream, "Do whatever you want to my wife, but leave me alone!" You will then create a distraction by throwing your newborn at the assailant as you dive through the window to safety. Now you know.
Music lost to history:
Aerosmith - Dream On When I started doing these, I could never have imagined that I would be putting an Aerosmith song here. Since I was born in 1974, this song is well before my generation. It was recorded in 1972 and released in 1983 on Aerosmith's Self-Titled Album, but to read the information on it at Wikipedia most of us would become familiar with it from a re-release in 1976.
Like most of the music being released in the late 60's/early 70's that was pushing the rock-n-roll envelope, Dream
On relies heavily on solid composition and and melody. Before the era of the modern effects processor, these bands
had no distortion to hide behind (or very little), and synthesized instruments hadn't yet made their way into music. In
that way the music always sounds more raw to us today because, quite simply, it was. While it seems laughable to think
about today, music like this was so far removed from the bubble-gum pop of the 50's that it still wasn't accepted into the
mainstream. As the baby-boomers became the target demographic, the rock-n-roll movement really started to pick up speed,
with bands like Led Zeppelin and Aerosmith clearing the path for the much darker and heavier bands like Black
Sabbath.
While I (and most of my generation) are probably far more familiar with the Aerosmith of the late 80's and early 90's, the
reason this song makes it onto my MLtH page comes down to one thing: Age. Not necessarily the age of the song; In fact,
as I sat down to do the research for this today, I had no idea when it was released, but would have guessed (closely) the
mid 70's. Tyler was born March 26, 1948, meaning that this song was written when he was only 24 years old. I'm not sure
why, but I have always thought this song was pretty amazing given his age at composition. I suppose it is human nature to
wax poetic about the days of yore and the imminent passage of time, but the melody sets a mood that makes you feel it
right along with him. As the song nears the end and his lyrics become more more frenzied, you can almost feel the pain
(longing?) in his voice. Listen to it with headphones and no distraction sometime, you'll see what I mean.
I wrote a short bit some time ago about Kelly Sweet's cover of this
song (see the video on Youtube). While I have since gotten over
the initial hatred I felt towards the cover of the song, I still just can't like it. The words are there; she hits the
notes; but I just can't hear it in her voice. As if there is somthing very personal about the song and Tyler's
deliverance of the lyrics that just can't be duplicated. At least to me.
That said, I have heard Aerosmith doing the song with an orchestra, and it also seems to lack the passion of the original.
So perhaps the thing that I like so much about it is the under-produced, raw sound of it, or it may be that I am still
hearing it through the ears of that impressionable youth that heard if for the first time in a dusty old Van with my Uncle
Art. Either way, it seems it is Lost to History.
I Can't Believe it's Not Porn!
WhorePresents.comYep, it's not porn. It's not a site with gifts for sale either, which is probably a good thing since I can't imagine that any woman would be at all flattered to get a gift -no matter how nice- in a box that says "Whore Presents.com" on it.
Daily Reading:
BlackChampagne
Magazine Man
Shane Nickerson
Wil Wheaton
Boners
Hoyazo's Poker Blog
My reading list changes from time to time, and there are many sites that I visit that are not on the list.
They are listed in the order that I visit them, enjoy!
![]()
Installing case fans (aka cutting into the tower)
I consider myself to have a moderate knowledge of computer hardware, and that was more than sufficient for this job. I also consider myself to be relatively skilled in the all-purpose-handyman type skills necessary for the install, but honestly it was easy enough that I would expect someone with little or no skill or knowledge on either subject would be able to complete this. From powering down the pc to having it back up and running took me roughly two hours. I could have done it quicker, but I was stopping to take pictures, and I was extremely nervous when I got the power tools to the case and took it really slow.
Tools: Adding the case fans only took a screwdriver, but cutting the hole for the top vent fan required a Jigsaw and a
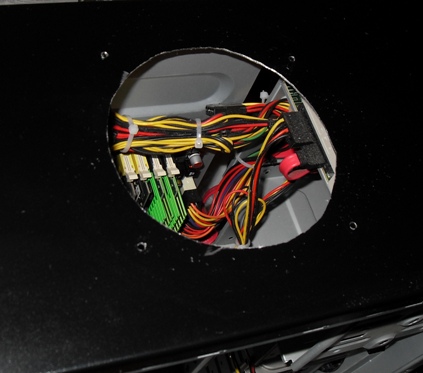 Here we go. I stopped for the first picture after I had made the cut in the top of the case and punched the screw holes. I used one of the metal grills that I bought as a template and etched a line around it with my pocket knife (this would have been easier if I had a silver sharpie, but I didn't). I used a jigsaw to make the rough cut, then smoothed the edges with the rotary tool. I used the same grill as a template for the screw holes; I held it in place with one hand, put the rotary bit into each of the mounting holes, and drilled through. It took a bit of light grinding to get the holes large enough to accommodate the screws, and it was also necessary to grind the underside of the case to flatten out the raised edges the drilling had left behind. In the picture you can see all of the electronics, and unfortunately I did have to make the cut with the tower assembled; the top is actually riveted to the frame so I had little choice. I put a scrap piece of cardboard between the top and the electronics while I was making the cuts, it kept the metal shavings from getting onto the delicate parts.
 As you can see the cutting and grinding left some exposed edges. I wish I had thought ahead and bought some high gloss black paint to hide the edges. The majority of what you see here though is just metal shavings that didn't come off with compressed air. I was able to clean them up with a rag and some alcohol later, so all you can really see at this point is a little silver ring right around the edge. The hole didn't come out exactly round, but I didn't really expect perfection here. The fan and grill are covering the hole from both sides, so pretty damn close to round is good enough for my purposes. Of course if I had been doing this for someone else I would have spent a lot more time on this portion of it, making sure to get the hole exact and the edges finished, but for me this was perfectly acceptable. You can pick up a three pack of these black metal grills on newegg for about 5 bucks. You should always cover the exterior fans, but an exhaust fan just needs something to make sure nothing falls into it and these do nicely.
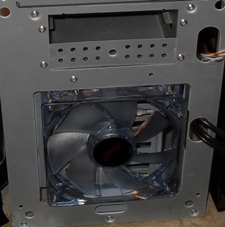 Installing the front fan actually turned out to be more work than installing the top one. Getting the front panel off was a bit of a chore. There are little plastic clips wedged between the HDD bays and the sides of the tower that you have to squeeze and pull forward to get to release, this took me needle-nosed pliers and a lot of patience, though I imagine all towers have these installed differently. In addition to the plastic clip hassle, the screw holes for the fan were much too small for the screws to fit through, so I had to drill them out. Unfortunately the area I was having to drill is so very close to the edges that I had to do it at somewhat of an angle. I went really slow and checked the size frequently to make sure I stopped before making them too big. Finally, I had to remove the Hard Disk to access two of the screw holes when I got to actually screwing the fan into place. As I said, installing this fan was probably more difficult, and definitely too longer, than installing the top exhaust fan. I should also point out that I was so paranoid that I was going to install the fans backwards that I must have checked each of the air direction arrows half a dozen times before I tightened down the screws.
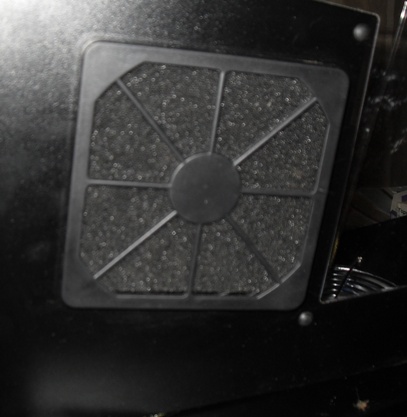 The side fan was very simple to install, that was why I saved it for last. This is the same fan as I installed on the top and the front, but this one I put a grill and filter assembly onto. Of course keeping dust out of your machine is paramount, so wherever possible you should put filters onto your intake fans. I think this grill and filter set cost 6 bucks on Newegg. The outer cover of it snaps off so you can clean out or replace the filter, and there is actually a grill hidden by the filter that looks just like the one I put on top of the case, only made of plastic. Bear in mind that it is made out of thin plastic, so take care when you are removing and replacing it. I briefly debated putting the filter on the inside of the case with the fan blowing through it so that the LED's would show more prominently. In the end I opted against that, knowing that I would probably never pull the case apart to clean the filter, this way it is staring at me all the time, hopefully it will guilt me into it.
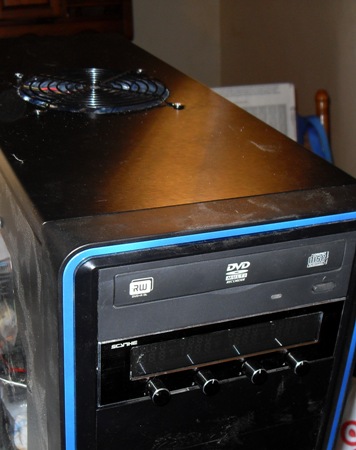 The fan control was actually really simple to install. Especially so since I already had the front opened to put the fan in. There is a jumper on the circuitry that allows you to set the temperature display to Fahrenheit and Celsius, I opted to move it to Fahrenheit so I wouldn't have to keep a calculator handy to figure out how hot it was. The instruction page for this was done in about 7 different languages and I couldn't find the English portion most of the time, but the circuit board actually had print on it -in English- that said "Fan 1", "Fan 2", "Temp1", "Temp2", etc. I just went by that for the cable routing. I ended up with one temperature sensor each at the top, front, and bottom of the case, with the fourth actually attached to the housing for my Power Supply. The instructions did have a warning about getting the wires too close to heat sinks, and I was independently worried about them getting into the now plentiful fans, so they just ended up more or less right where the fans were installed -even if that was not the place I really wanted to know the temperature. Also in the picture you can see that the top exhaust fan install is actually much smoother than it appeared in the other pictures. And you can see that fine layer of dust all over the machine. This dust is all from the install process, as I dusted it thoroughly prior to the install, so make sure that you use compressed air liberally inside the machine before you power it back up; I must assume that this dust is from grinding the metal, and I can't imagine a more conductive material than metal powder to short out your Motherboard.
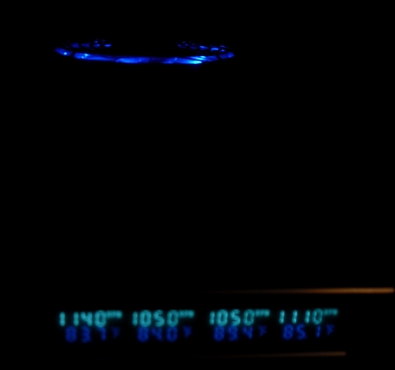 Here is the fan control just as I powered it up, you can also see the LED's of the top exhaust fan. I have all of the fans set right about half speed as I am checking to make sure I don't have any phantom noises like scratching, scraping, or thermonuclear meltdown. I didn't realize until I actually had the machine back together that this fan control allows you to turn off each of the fans, which is nice, and that the LED's dim with the speed control. I also didn't realize until I had it back together that the stock exhaust fan is only capable of running at about half the RPM of the new fans I installed. While the others can go to about 1900 RPM (as read on the fan control) the stock one can only do 1050. I wish I had bought one more fan and replaced it, although I'm fairly certain the other three fans can make up for it.
 When I bought the fans, controller, and grills, I got a free blue (my choice of red, blue or green actually) dual cold cathode lighting kit. I went ahead and put it in here, 'cause what the hell else am I going to do with it? As you can see by the mass of wires on the right, I've never been one for the "finishing touches" aspect of this type of work. Thankfully that cold cathode lighting kit has a switch (that mounts into an empty pci bay -which I have about 6 of with no corresponding slots on the motherboard) that I can easily turn off. Which is how it will remain unless there is someone who really wants to see just how bright I can make that mess of wires look.
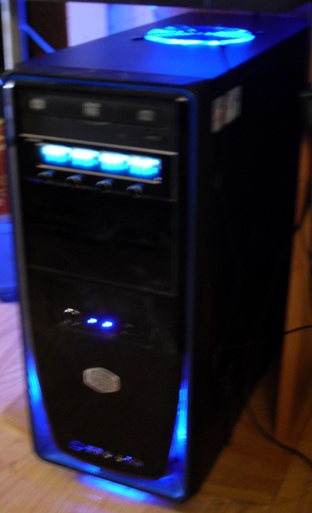 Here is the finished product in as near darkness as I can get it at noon in Arizona. My camera has some weird feature that makes it so the flash free photos take a second (well fractions of a second, but it's relative; it takes longer than instantaneous) to process, and that makes for slightly blurry photos. I have to admit that I am very pleased that I went with the LED fans. They really do transform it from being just a plain metal box to something... well, to something. I especially like the way the front intake lights up the trim around the bottom of the front. And in the dark that top exhaust fan looks like it was meant to be there. I have spent a lot of time working with computer hardware, but this is the closest I have yet come to any actual modification. It was easy enough, and the result is eye-pleasing enough, that I won't hesitate to do it again if I should ever find myself in a position where I need to.
The total cost of this install was about $75 shipped from Newegg. That includes three 120mm blue LED fans, the Scythe fan control unit, the three pack of black metal grills (of which I only used one for this install), and two of the grill and filter packs (again, only one used during the install. I was planning to put one on the front intake, but the difficulty of getting to the fan nixed that idea, it would take me an hour to clean the filter). As I said, it took about two hours from power down to power up. That includes the time spent searching for stubby screwdrivers, digging out a flexible screwdriver extension, trying to find my new jigsaw blades, 'cause dammit I know I just bought some, etc.
Cutting into the case was really quite intimidating for me, and I wasn't able to find a "how-to" type guide to answer any questions I had before going into it. It turns out that the case actually cuts quite easily with a standard, all-purpose jigsaw blade, and as long as you take your time for the cut it will look just fine when you are done. If you happen to be thinking about doing this either because you need the additional airflow, or just for the eye appeal, don't hesitate to do it; it is really pretty simple, and the result looks pretty cool.
Archives
June 2005 July 2005 August 2005 September 2005 October 2005 November 2005 December 2005 January 2006 February 2006 March 2006 April 2006 May 2006 June 2006 July 2006 August 2006 September 2006 October 2006 November 2006 December 2006 January 2007 February 2007 March 2007 April 2007 May 2007 July 2007 October 2007 December 2007 February 2008 August 2008 January 2009 February 2009 March 2009 April 2009 July 2009 August 2009 October 2009 November 2009
Site design was stolen directly from Blackchampagne.