Site Links:
Arthur Witles
Who I am - Site info
Music Lost to History Archive
Horoscope Archive
Original Poetry
Pre-Blogger Archives
Stuff I Made
Vacation Photos
My coming of age story.
Programs I use for the site
Email me
Latest Humorous T-shirt Slogan:
"You Wish!"
This one has to be taken in context to be appreciated. The girl wearing this belly shirt was maybe 5'0" tall, with a muffin top going on, despite the fact that she was clearly in her third trimester of pregnancy. In addition she was wearing a thong that came up past her low-rise jeans and pushed her muffin top down over the edge to really emphasize the roll. I'm not in perfect shape so I don't expect that others should be, but when you are wearing that shirt, along with the rest of the outfit, you open yourself to scrutiny (and perhaps random looks of horror).
It's fun to hate:
The Soccer Moms who insist that they drive gas-guzzling SUV's for the safety of their children despite the fact that they are 6 times more likely to be in a rollover
accident than any other vehicle. It's like beating your child unconscious with the butt of your gun so that he will remain on the floor, thus making him less likely
to be hit by a random bullet coming through the front window.
When Shadowtwin reigns supreme:
There will be mandatory, passive birth control required to participate in any form of government assistance. If you can't afford to raise your child on your own we are here
to help you, but we must first make sure that your reproductive organs are adequately contained. If you don't like that policy all you have to do is support your kids your
damn self!
Vote Shadowtwin!
Your Horoscope:
 Sagitarius: 11/22-12/21
A typographical error in your Church's newsletter will lead to you performing sex acts on dozens of anonymous strangers in your pursuit of "oral highground."
 Capricorn: 12/22-1/19
The stars did recently tell your wife to "listen to her heart" regarding whether or not she should leave you. The stars did not intend for you to listen to her heart. But once you used that bonesaw on her sternum (not trusting the stethoscope which just responded with a cryptic thumping sound), we're pretty sure she made up her mind anyway.
 Aquarius: 1/20-2/18
The stars would like to apologize for stating in their last prophecy, "Be wary of the stranger you meet at beach this weekend. The stars aren't sure why, but they don't trust him." Through a cosmic hiccup, that information was supposed to be released this month. The August prophecy should have read, "A dark and handsome stranger will approach you on the beach, profess his love for you, and sweep you away for a jetset marriage. After which you will lead a long, happy, prosperous, healthy life as the Queen of a small island nation." We apologize for any inconvenience this error may have caused.
 Pisces: 2/19-3/20
Your new stopwatch will allow you to time how long you can hold your breath underwater down to the thousandth of a second. Unfortunately, poor planning will mean that you are not able to actually share the information with anyone.
 Aries: 3/21-4/19
Your innovative new device for beauticians to use while giving pedicures can be wildly successful and make you quite wealthy IF you change the name. Trust us, no one is going to buy a "Ped-O-File".
 Taurus: 4/20-5/20
Your Mother always told you to wear clean underwear just in case there was an accident and paramadics had to see them. But as you board that plane today, the stars want you to know that you needn't worry about it. The debris field will be more than 8 square miles, making it impossible to find most human remains. Not to mention that the ensuing fire burned so hot that it disintegrated not only all fabric, but most of the thin metals aboard as well.
 Gemini: 5/21-6/21
You just had to get that genital piercing, didn't you? The stars tried to warn you not to, but you went ahead and did it anyway... Now all your worst fears will come to bear when, at a campground this weekend, you run afoul of this guy:

 Cancer: 6/22-7/22
The less traveled by areas of the Grand Canyon's north rim offer some of the most breathtaking views of this natural wonder. You will soon find out they also include some of the worst footings and none of the handrails. They do, however, provide equally awe-inspiring, terminal velocity impacts.
 Leo: 7/23-8/22
The stars heard your pleas, begging for someone who you could share your love with and embrace for the rest of your life. If you are still single, throw your arms around the closest person to you at 3:44pm GMT on Dcember 9th -That'll be the one. Trust us, you won't have time to be picky...
 Virgo: 8/23-9/22
The stars have piled up most of your things on the front porch. You can stay at a friend's house, but you aren't coming back home until you admit what you did and apologize. The stars' Mother was right about you... (you must have really pissed them off; the stars were in tears while they told me this)
 Libra: 9/23-10/22
The stars have been doing a little thinking and a lot of math. The population of planet earth is roughly 6,796,590,704. That means that roughly 566,382,558 people share each astrological sign. About 18,620,796 have the same birthday. Based on average life expectancy as many as 248,277 people were born on the same day, in the same year, for every zodiac sign. How can one statement possibly predict the future of all of them? Ehh, fuck it. "A full moon while Venus is rising is an omen of good things to come."
 Scorpio: 10/23-11/21
They say you never know how you are going to react to a crisis. After a home invasion this weekend you will: You will scream, "Do whatever you want to my wife, but leave me alone!" You will then create a distraction by throwing your newborn at the assailant as you dive through the window to safety. Now you know.
Music lost to history:
Aerosmith - Dream On When I started doing these, I could never have imagined that I would be putting an Aerosmith song here. Since I was born in 1974, this song is well before my generation. It was recorded in 1972 and released in 1983 on Aerosmith's Self-Titled Album, but to read the information on it at Wikipedia most of us would become familiar with it from a re-release in 1976.
Like most of the music being released in the late 60's/early 70's that was pushing the rock-n-roll envelope, Dream
On relies heavily on solid composition and and melody. Before the era of the modern effects processor, these bands
had no distortion to hide behind (or very little), and synthesized instruments hadn't yet made their way into music. In
that way the music always sounds more raw to us today because, quite simply, it was. While it seems laughable to think
about today, music like this was so far removed from the bubble-gum pop of the 50's that it still wasn't accepted into the
mainstream. As the baby-boomers became the target demographic, the rock-n-roll movement really started to pick up speed,
with bands like Led Zeppelin and Aerosmith clearing the path for the much darker and heavier bands like Black
Sabbath.
While I (and most of my generation) are probably far more familiar with the Aerosmith of the late 80's and early 90's, the
reason this song makes it onto my MLtH page comes down to one thing: Age. Not necessarily the age of the song; In fact,
as I sat down to do the research for this today, I had no idea when it was released, but would have guessed (closely) the
mid 70's. Tyler was born March 26, 1948, meaning that this song was written when he was only 24 years old. I'm not sure
why, but I have always thought this song was pretty amazing given his age at composition. I suppose it is human nature to
wax poetic about the days of yore and the imminent passage of time, but the melody sets a mood that makes you feel it
right along with him. As the song nears the end and his lyrics become more more frenzied, you can almost feel the pain
(longing?) in his voice. Listen to it with headphones and no distraction sometime, you'll see what I mean.
I wrote a short bit some time ago about Kelly Sweet's cover of this
song (see the video on Youtube). While I have since gotten over
the initial hatred I felt towards the cover of the song, I still just can't like it. The words are there; she hits the
notes; but I just can't hear it in her voice. As if there is somthing very personal about the song and Tyler's
deliverance of the lyrics that just can't be duplicated. At least to me.
That said, I have heard Aerosmith doing the song with an orchestra, and it also seems to lack the passion of the original.
So perhaps the thing that I like so much about it is the under-produced, raw sound of it, or it may be that I am still
hearing it through the ears of that impressionable youth that heard if for the first time in a dusty old Van with my Uncle
Art. Either way, it seems it is Lost to History.
I Can't Believe it's Not Porn!
WhorePresents.comYep, it's not porn. It's not a site with gifts for sale either, which is probably a good thing since I can't imagine that any woman would be at all flattered to get a gift -no matter how nice- in a box that says "Whore Presents.com" on it.
Daily Reading:
BlackChampagne
Magazine Man
Shane Nickerson
Wil Wheaton
Boners
Hoyazo's Poker Blog
My reading list changes from time to time, and there are many sites that I visit that are not on the list.
They are listed in the order that I visit them, enjoy!
FTP
Core FTP has roughly the same minimal features, but with the bonus of not locking up at random intervals. An additional bonus is that it automatically refreshes the remote directory on upload, that's something that I always wished Leech did. It occurs to me that rather than post that here I really should just make a short list of links to put on my sidebar with all the programs that I use for website related stuff. Then I could just visit my page to download them if the need arises. But damn I am lazy...
Shower faucets aren't really figner tight
The problem with the shower is a bit odd, really. For reasons unknown the hot water side will gain and lose pressure seemingly at random. It could go for 2 weeks without having a problem, it could go for 2 weeks without working properly. I had tried disconnecting the hot water line and just blowing water through it without success, so I needed to try something else. The plan was to try to just pull the control lever and clean the fittings inside of that; possibly replace a couple of the rubber seats. Of course this all went to hell the second I touched it.
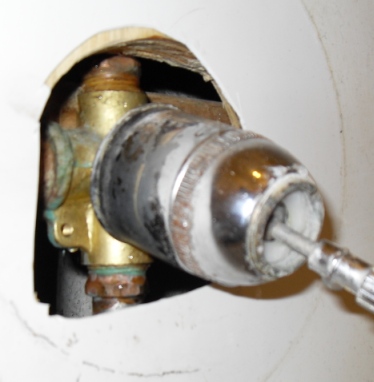 You can see that little bastard here. I have taken off the trim already, and started trying to take the ring that holds the faucet together off. Up to this point it hadn't been working -which is to say that it wouldn't move a bit- so I knew it was only a matter of time before this minor repair became a major headache. You can actually tell from the photo that the whole faucet has been moving as I have been trying to apply gentle and even force with a wrench, you can also tell by the angle it is currently at that is hasn't been working to loosen the retaining ring at all. I already have the water off at this point, and I have no intention of stopping until I get the damn thing working again, for better or worse, so I grabbed the camera to document the
  There are lots of instructional videos online showing just how to do this (take the ring off and replace the seats and springs, that is), and in all of the videos these fittings are barely finger tight, and the entire operation takes about two minutes. Of course in the real world you will be there with a pipe wrench -actually leaning on it for additional torque- and the fucker is going to break. You'll know you've reached this point when the water starts pouring out of the handle as seen here. Pretty much as expected I broke one of the lines on the back of the faucet well before the retaining ring broke free. I want to point out the quality of the image though: you are seeing a version that is cropped pretty heavily and reduced to 20% of the original size, and still those little water droplets just hang there, as if frozen in time... It's a good thing I had the camera handy, eh?
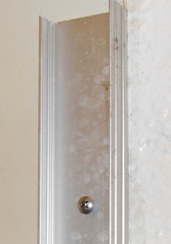 Another thing that all the instructional videos I saw online had in common was that there was always ready and easy access to all of the plumbing. That's nice for making a video, but a house generally tends to have most of the plumbing fixtures hidden away in walls. They are much more difficult to get at there, but they also aren't nearly as much of an eyesore. My house is one that has said plumbing connections hidden away, so there was much work to be done. The wall behind the shower (the one on the outside of the bathroom) is about 18 inches of solid adobe. There is an access panel that goes about halfway up the back of the bathtub, but no reasonable way to access the faucet from there. You can reach the water supply lines and that is about it. That meant I had to do all the work from the front (and theoretically finished) side. First I had to remove the sliding glass doors that I put in when I initially remodeled the bathroom a few years back. That is easy enough; the top bar is held in place only by gravity, and each end is easily pulled off by removing three screws and cutting the bead of silicone running along the edges.
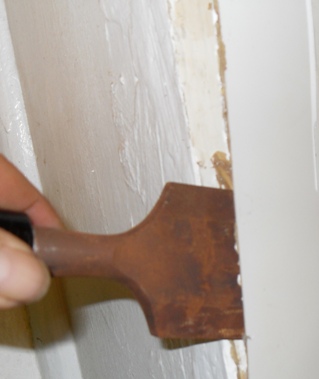 The walls of my bathtub/shower are covered with a 5-piece pre-molded surround. This also went in when I did the bathroom remodel. Previously there had been 8"x8" ceramic tiles that ran only about 30 inches up the wall. Water had gotten between and behind them and done some horrible damage to the adobe. Water is the #1 enemy of any structure, but in adobe that is tenfold: water + packed dirt = mud. The goal was now to try to remove this piece of the surround without doing extensive damage to it. I expected I was probably not going to be able to do it without getting any cracks in it, but I was hoping that I would be able to reuse it; I really don't want to have to replace the entire surround. So with a chisel and some finesse, off to work I go.
 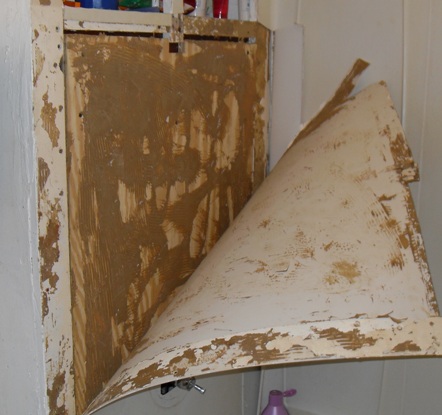 Now having mentioned the prior problems I had with water getting behind the shower enclosure, I knew that I took extra effort to make sure that it wouldn't happen again. I remember being pretty liberal with the liquid nails on the back of all of the panels, then going batshit with the silicone near the top and edges, but even I was surprised to see just how much glue I had holding this thing up. I mean holy mother-loving shitballs that is a lot of glue! I was taking my time here to try to do this slowly, peeling it back a little at a time, trying not to let it crease so that it wouldn't crack. You can see one large crack near the top of the picture but thankfully that is behind an overlap when installed.
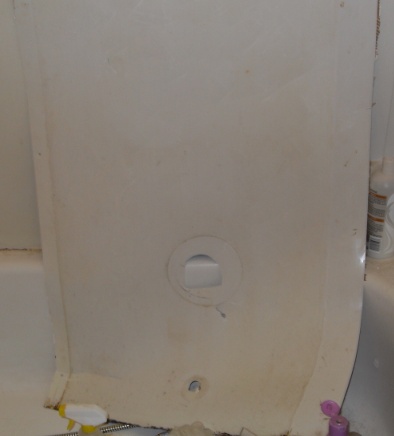 I managed to get it off in one piece, with only a minimum of damage. Near the bottom left you can see a crease which would end up cracking, but with a little bit of caulking it will be just fine. If I was doing this for someone else I would certainly replace this whole sheet (I should also point out that there is absolutely no way I would do this for someone else anyway, so that example probably doesn't mean much), but since it is my house and I don't mind a few imperfections this is good enough for me. I would move this out of here and lay it flat on the floor after I saw that first crease form, and that was the only visible crack that formed during the process.
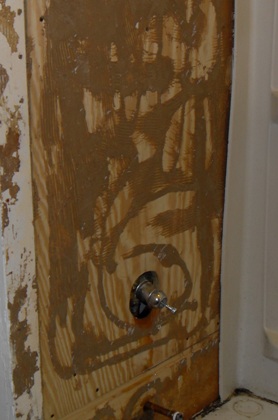 Getting the plastic surround off was really the only part I was dreading. Once I got down to the lumber and plumbing I was a lot more confident that I could do this without too much of a headache. The plywood that you see in the picture here was all added when I remodeled the bathroom. There had been a couple of 1"x4"'s behind this previously that were holding up some particle board, and it had all rotted through. Plywood is not an ideal structural material, but in this application the only thing it is actually holding up is the thin plastic shower surround, so there isn't any real weight to it, and it needed to be smooth. This whole thing came off easily, there are about 10 screws holding it up (they can be seen as little black dots throughout). A couple of them had gotten hidden behind that ridiculous mass of glue, but I was able to get them all out pretty easily to get at the plumbing.
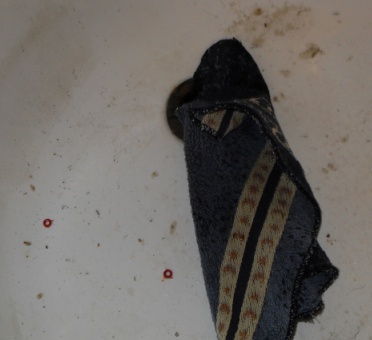 The cup that I had been holing all of my screws and other hardware in got knocked over into the tub. As I was picking the parts up, I snapped this picture. If you are ever working on a sink or bathtub, make sure you plug the drain. I just threw a handy washcloth in there, and as you can see there are still a couple of little red washers in there from where the cup tipped. I'm sure that the sliding glass door frame would go back up just fine without them, but the less crap you get in your drain the better. The last thing you want is to have to tear out your drain as well.
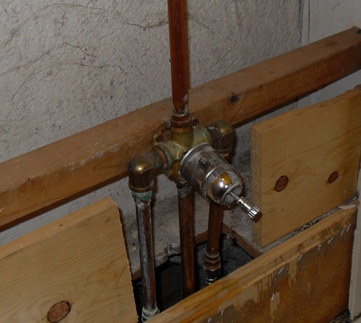 Here we see the faucet assembly. The board that it is mounted to is another addition I had to put in there, the old faucet had been simply held in by the pipes and I needed to change that. Also the little pieces of one inch lumber on the sides were added to give me a couple more screw points for the plywood front. Down at the bottom you can see a piece of lumber with a square cut out if it, that exterior access is just below that. As you can imagine it would be impossible to get a screwdriver all the way up to the faucet mounting screws from there. I am to the easy part at last!
 This shot is just to get a good look at the copper and bronze fittings. You can see a lot of discoloration on them right near the tips, and the hot water side has some running the length of the pipe, but being copper and bronze these are still in pretty good condition and don't really need to be replaced. Those bronze elbows go 5-8 bucks each (depending on the store) and sweated copper pipe can last a hundred years easy, so there is really no need to replace it.
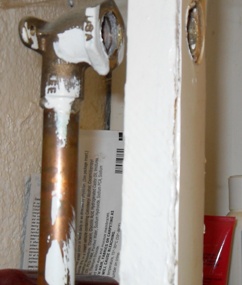 Remember to disconnect the shower head assembly before you start trying to remove this line. I actually neglected to do that during the remodel and was forced to replace the entire line after I applied about three ass tons of force and creased the copper. This top piece is usually in a finished chrome so be careful not to damage it if you are going to reuse it. I find that you can usually stick a screwdriver inside of it and use it for leverage (the top piece that goes into the shower should be bent so this works nicely).
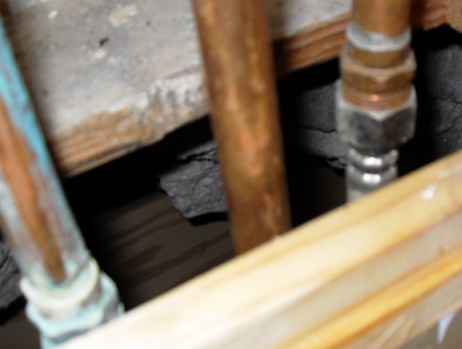 Disconnect the water supply. I am going to point out that this is one area where I probably went far astray from building code. I really shouldn't have the flex lines you see there in this application. I should be using compression fittings for this (the ones with the nut that crimps down on the pipe to tighten it) and I think building code would dictate that since this is inside a wall you shouldn't have this type of connector (I can't swear to that) but when I put this thing in I knew I was going to have to replace it eventually, and using the flex lines meant I would be able to put just about any faucet back in here, where if I had gone with a solid line I would have had to do a lot of cutting and soldering if it didn't all line up. I do have access to these lines from the outside (note the hole in the block in the back of the picture) and since I am replacing the faucet now I sure am glad I did it this way.
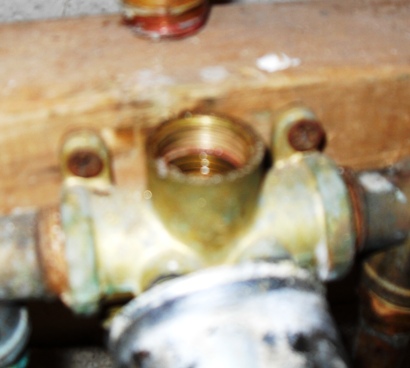 Once all the other water lines are disconnected, there are only a couple of screws holding the faucet up. These ones were rusty as hell, but they came right out.
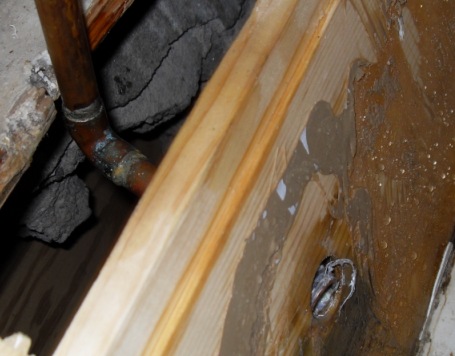 Then to pull the spout out... Unfortunately the length of this piece of pipe wasn't something that I had a great deal of control over. It had to be long enough that the spout would sit snugly against the wall when the whole thing is assemble, and as it turns out that is about an inch longer than the space I had available to remove it. As you can see I actually had to notch a piece of the lumber out in the back to get this thing pulled out. Again, the plan is to reuse all of this, so I didn't want to just cut the pipe.
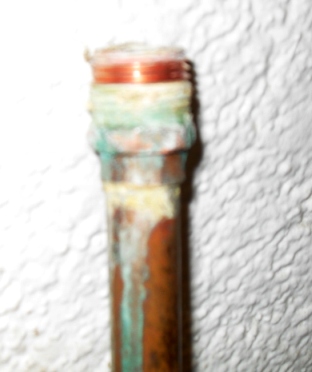 I wanted to take a shot of this one to show the actual end of the pipe. While it looks extremely corroded, you can see that the threads are still in excellent condition. There was clearly a leak at some point, or it could be from condensation, these lines are not in an insulated area, but there is no damage to any of the pipes or fittings beyond superficial. The flux was still clean and unbroken, there were no bends, kinks, or crimps. I'm sure your helpful hardware store attendant would probably give you the opposite advice, and equally as sure that a general contractor would point to the corrosion as evidence of a need to replace all the plumbing in the house, but in the real world there is no need to throw money at it just because the faucet was faulty.
 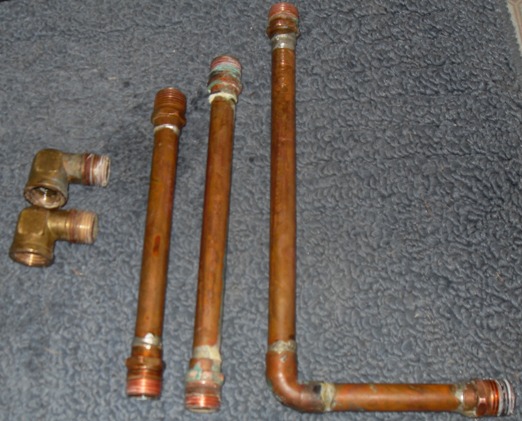 Here are those pieces again, cleaned up just a bit. Just hit them with a wire brush to get rid of any loose debris. The only concern is anything on the threads that might keep the teflon tape from making a seal, remnants of old teflon tape doesn't fall into that category. Also I didn't clean the threads all the way to the nut simply because it's not necessary to screw them any tighter than a couple of turns. Again, a contractor may offer different advice, but we are looking at real world application. Just as there is no need to waste a lot of money, there is also no need to waste a lot of time, unless you happen to be paying yourself by the hour for this repair, if that's the case, by all means, clean those pipes up like new!
  Here is the whole assembly reattached to the new faucet. You can see that the teflon tape hid all those imperfections around the threads anyway. A couple things to note if you are using a single faucet handle like this: The first is to make sure that you have the correct side up. It would be entirely possible to install this thing upside down. As I'm thinking about it, it might still work upside down, but better safe than sorry. The second is to make sure you get the pipes oriented correctly. I could probably still turn each of those pipes a quarter turn with a wrench, give or take, but since they have to line up, snug (with a wrench) is all you need; if you get stuck and are force to back it out, remove the pipe, retape it, and do it again.
 It all goes back together just the way it came apart. Just hook it all back up and, with any luck, there won't be any leaks. Make sure to test it for leaks before you put the whole wall back together. I have the wallboard only connected by three screws and the laminate cover not glued in place so that I can check again in a couple days to make sure the temperature changes don't cause it to start leaking.
And that is about as far from the three finger-tightened screw walktrhoughs that you are going to find.
Help my wife raise money for breast cancer! (please)
She is doing her fund raising exclusively online this year, and I wanted to pass that link on to some people at work, unfortunately the web address to make a donation to her is: "http://main.acsevents.org/site/TR/MakingStridesAgainstBreastCancer/MSABCFY10GreatWest?px=2331810&pg=personal&fr_id=19864". Since I know that some people will have to actually write the link down, I decided I would just throw a link to it up here, 'cause shadowtin.com is easier to remember than http://main.acsevents.org/site/TR/MakingStridesAgainstBreastCancer/MSABCFY10GreatWest?px=2331810&pg=personal&fr_id=19864.
So here is that difficult to copy and paste link in a handy, clickable format.
Please go and donate...Or I curse you to experience homosexual desires the next time you see bare breasts!
Installing case fans (aka cutting into the tower)
I consider myself to have a moderate knowledge of computer hardware, and that was more than sufficient for this job. I also consider myself to be relatively skilled in the all-purpose-handyman type skills necessary for the install, but honestly it was easy enough that I would expect someone with little or no skill or knowledge on either subject would be able to complete this. From powering down the pc to having it back up and running took me roughly two hours. I could have done it quicker, but I was stopping to take pictures, and I was extremely nervous when I got the power tools to the case and took it really slow.
Tools: Adding the case fans only took a screwdriver, but cutting the hole for the top vent fan required a Jigsaw and a
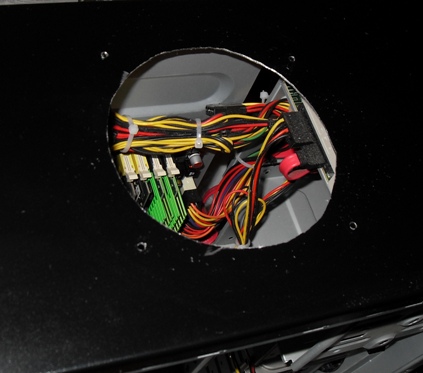 Here we go. I stopped for the first picture after I had made the cut in the top of the case and punched the screw holes. I used one of the metal grills that I bought as a template and etched a line around it with my pocket knife (this would have been easier if I had a silver sharpie, but I didn't). I used a jigsaw to make the rough cut, then smoothed the edges with the rotary tool. I used the same grill as a template for the screw holes; I held it in place with one hand, put the rotary bit into each of the mounting holes, and drilled through. It took a bit of light grinding to get the holes large enough to accommodate the screws, and it was also necessary to grind the underside of the case to flatten out the raised edges the drilling had left behind. In the picture you can see all of the electronics, and unfortunately I did have to make the cut with the tower assembled; the top is actually riveted to the frame so I had little choice. I put a scrap piece of cardboard between the top and the electronics while I was making the cuts, it kept the metal shavings from getting onto the delicate parts.
 As you can see the cutting and grinding left some exposed edges. I wish I had thought ahead and bought some high gloss black paint to hide the edges. The majority of what you see here though is just metal shavings that didn't come off with compressed air. I was able to clean them up with a rag and some alcohol later, so all you can really see at this point is a little silver ring right around the edge. The hole didn't come out exactly round, but I didn't really expect perfection here. The fan and grill are covering the hole from both sides, so pretty damn close to round is good enough for my purposes. Of course if I had been doing this for someone else I would have spent a lot more time on this portion of it, making sure to get the hole exact and the edges finished, but for me this was perfectly acceptable. You can pick up a three pack of these black metal grills on newegg for about 5 bucks. You should always cover the exterior fans, but an exhaust fan just needs something to make sure nothing falls into it and these do nicely.
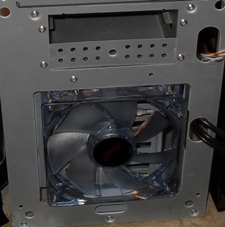 Installing the front fan actually turned out to be more work than installing the top one. Getting the front panel off was a bit of a chore. There are little plastic clips wedged between the HDD bays and the sides of the tower that you have to squeeze and pull forward to get to release, this took me needle-nosed pliers and a lot of patience, though I imagine all towers have these installed differently. In addition to the plastic clip hassle, the screw holes for the fan were much too small for the screws to fit through, so I had to drill them out. Unfortunately the area I was having to drill is so very close to the edges that I had to do it at somewhat of an angle. I went really slow and checked the size frequently to make sure I stopped before making them too big. Finally, I had to remove the Hard Disk to access two of the screw holes when I got to actually screwing the fan into place. As I said, installing this fan was probably more difficult, and definitely too longer, than installing the top exhaust fan. I should also point out that I was so paranoid that I was going to install the fans backwards that I must have checked each of the air direction arrows half a dozen times before I tightened down the screws.
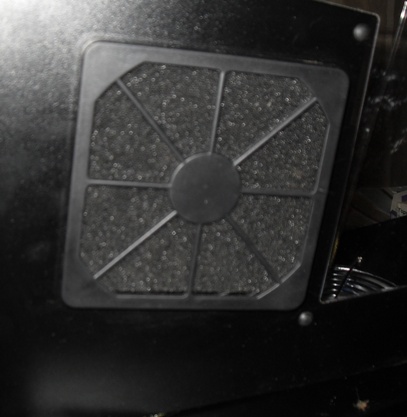 The side fan was very simple to install, that was why I saved it for last. This is the same fan as I installed on the top and the front, but this one I put a grill and filter assembly onto. Of course keeping dust out of your machine is paramount, so wherever possible you should put filters onto your intake fans. I think this grill and filter set cost 6 bucks on Newegg. The outer cover of it snaps off so you can clean out or replace the filter, and there is actually a grill hidden by the filter that looks just like the one I put on top of the case, only made of plastic. Bear in mind that it is made out of thin plastic, so take care when you are removing and replacing it. I briefly debated putting the filter on the inside of the case with the fan blowing through it so that the LED's would show more prominently. In the end I opted against that, knowing that I would probably never pull the case apart to clean the filter, this way it is staring at me all the time, hopefully it will guilt me into it.
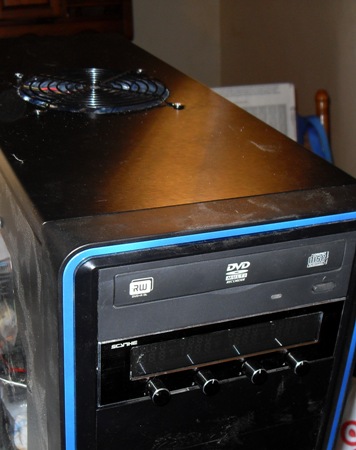 The fan control was actually really simple to install. Especially so since I already had the front opened to put the fan in. There is a jumper on the circuitry that allows you to set the temperature display to Fahrenheit and Celsius, I opted to move it to Fahrenheit so I wouldn't have to keep a calculator handy to figure out how hot it was. The instruction page for this was done in about 7 different languages and I couldn't find the English portion most of the time, but the circuit board actually had print on it -in English- that said "Fan 1", "Fan 2", "Temp1", "Temp2", etc. I just went by that for the cable routing. I ended up with one temperature sensor each at the top, front, and bottom of the case, with the fourth actually attached to the housing for my Power Supply. The instructions did have a warning about getting the wires too close to heat sinks, and I was independently worried about them getting into the now plentiful fans, so they just ended up more or less right where the fans were installed -even if that was not the place I really wanted to know the temperature. Also in the picture you can see that the top exhaust fan install is actually much smoother than it appeared in the other pictures. And you can see that fine layer of dust all over the machine. This dust is all from the install process, as I dusted it thoroughly prior to the install, so make sure that you use compressed air liberally inside the machine before you power it back up; I must assume that this dust is from grinding the metal, and I can't imagine a more conductive material than metal powder to short out your Motherboard.
 Here is the fan control just as I powered it up, you can also see the LED's of the top exhaust fan. I have all of the fans set right about half speed as I am checking to make sure I don't have any phantom noises like scratching, scraping, or thermonuclear meltdown. I didn't realize until I actually had the machine back together that this fan control allows you to turn off each of the fans, which is nice, and that the LED's dim with the speed control. I also didn't realize until I had it back together that the stock exhaust fan is only capable of running at about half the RPM of the new fans I installed. While the others can go to about 1900 RPM (as read on the fan control) the stock one can only do 1050. I wish I had bought one more fan and replaced it, although I'm fairly certain the other three fans can make up for it.
 When I bought the fans, controller, and grills, I got a free blue (my choice of red, blue or green actually) dual cold cathode lighting kit. I went ahead and put it in here, 'cause what the hell else am I going to do with it? As you can see by the mass of wires on the right, I've never been one for the "finishing touches" aspect of this type of work. Thankfully that cold cathode lighting kit has a switch (that mounts into an empty pci bay -which I have about 6 of with no corresponding slots on the motherboard) that I can easily turn off. Which is how it will remain unless there is someone who really wants to see just how bright I can make that mess of wires look.
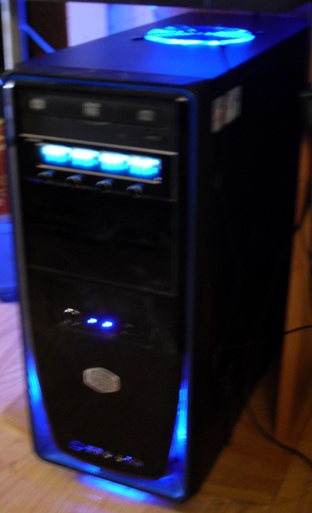 Here is the finished product in as near darkness as I can get it at noon in Arizona. My camera has some weird feature that makes it so the flash free photos take a second (well fractions of a second, but it's relative; it takes longer than instantaneous) to process, and that makes for slightly blurry photos. I have to admit that I am very pleased that I went with the LED fans. They really do transform it from being just a plain metal box to something... well, to something. I especially like the way the front intake lights up the trim around the bottom of the front. And in the dark that top exhaust fan looks like it was meant to be there. I have spent a lot of time working with computer hardware, but this is the closest I have yet come to any actual modification. It was easy enough, and the result is eye-pleasing enough, that I won't hesitate to do it again if I should ever find myself in a position where I need to.
The total cost of this install was about $75 shipped from Newegg. That includes three 120mm blue LED fans, the Scythe fan control unit, the three pack of black metal grills (of which I only used one for this install), and two of the grill and filter packs (again, only one used during the install. I was planning to put one on the front intake, but the difficulty of getting to the fan nixed that idea, it would take me an hour to clean the filter). As I said, it took about two hours from power down to power up. That includes the time spent searching for stubby screwdrivers, digging out a flexible screwdriver extension, trying to find my new jigsaw blades, 'cause dammit I know I just bought some, etc.
Cutting into the case was really quite intimidating for me, and I wasn't able to find a "how-to" type guide to answer any questions I had before going into it. It turns out that the case actually cuts quite easily with a standard, all-purpose jigsaw blade, and as long as you take your time for the cut it will look just fine when you are done. If you happen to be thinking about doing this either because you need the additional airflow, or just for the eye appeal, don't hesitate to do it; it is really pretty simple, and the result looks pretty cool.
PC cooling
I still happen to have about a half a dozen old pc's within thirty yards of the chair that I am sitting in now (I actually just gave two systems to my brother-in-law, who, not being a gamer, was more than happy with 1.5 year old stuff). I took a minute to look inside them specifically for fans and was surprised to find none. The only fans on any of the boxes I have around me are on the CPU and the power supply (a couple of the video cards also have small fans, but I don't put a lot of faith in those, for reasons I am sure I will discuss later). There are only vents on all of those boxes, so unless I happen to have them sitting in the direct path of a fan, the hot air inside them just sits there. I'm sure this has been my biggest problem all along: I probably wouldn't have to replace the PC every few months if they weren't left to bake in their own radiant heat.
 On the right here, you can see the case that my new machine came with. I'm not a huge fan of the overall design of the thing, I mean the window in the side could be a cool idea if there was anything in there to look at, but as it is all you can see is the dull gray metal of the case. I have, however, had the time to think it through, and I think I need to retract my previous statement about the box being too big. That, it seems, is a good thing. All the little parts in there generate a lot of heat, and in order to get that heat out I am going to need some serious airflow, the open space makes it easier to move the air. The case came with a 120mm exhaust fan pre-installed on the back panel, and there may or may not be an intake fan installed on the front under the logo (it is an option for the case, but I didn't pay much attention when I opened the case to upgrade the ram, and can't tell observing from the outside), and a spot to put one on the side of the case. I am going to put all of those to use, and I am going to add an extra exhaust fan on the top. I am going to go all out on this, I want to see just how much I can improve performance with nothing but cooling fans.
 Fans are dirt cheap. I really had no idea. I never really thought about how much they might cost, but I would have assumed they had to be more expensive than the 5 bucks a piece I dropped on these Rosewill fans. The manufacturer had a lot of good reviews for fans and power supplies, the price was right, and the LED's, well, I dunno, maybe they will add a cool factor, or maybe they will just be annoying. I am not in the room with the PC when I am sleeping or watching TV, so I don't imagine they could be much of an annoyance, but I somehow doubt they can transform my plain case into an otherworldly piece of alien technology...But I have been wrong before.
 Since I bought this system pre-made from Newegg, I didn't get to choose the box. Thankfully it has vent running all around the bottom part of the front; from roughly where the logo is down, there is a recess with a screen for ventilation. This, along with the mounting spots on the back and side, means I will only have to make one major modification to the box to get all the fans it: I have to cut a 120mm hole right in the top of it. Well, I am also going to cut out the whole "bullet hole grill" part of the side intake as well, but the top is the more major modification. I have never cut a hole in a computer case before, and I am a bit apprehensive about it. In fact, I plan to practice on one of the old machines laying around the house before I actually put a high speed rotary device to the real thing.
So for those of you keeping track at home, the last, say, 6 PCs I have bought have had a combined total of 0 case fans. This one is going to have 4 120mm fans. I spent some time reading up before I bought all the fans, and I should have enough power to keep everything running.
 One other thing that I bought for this project was a Scythe fan controller like the one pictured. I am honestly not 100% sure if this was actually necessary, but I did like the idea of being able to control the speeds; I have no idea how loud this is going to be with all four fans, plus the PSU fan and the CPU fan going on full speed. If it is deafening I would like to be able to turn it down a bit.
 I just wanted to get a quick note about this up here tonight, because I plan to unplug the PC and start cutting into it tomorrow. Hopefully it won't turn into some pseudo-nightmare and the carnage will be minimal. If it goes well I will probably slap up some photos and afterthoughts...If everything goes wrong, I will probably have to make my next post from my wife's computer.
PC and Music
There are two extremely annoying aspects to the Laptop crash. The first is that it was just after we got back from vacation, and aside from the photos that I have posted on the Vacation Photos page (in vastly reduced size and quality), I had no backups of the images that I lost. A total of roughly 300 pictures, from vacation photos to pets, just gone. Damn it. The other annoying aspect was the loss of all the programs I use for the website: Leech FTP, Screen Hunter (image saving program, saves pictures to file with a click of keyboard button), Audacity (music editing), and numerous others. Some of those are easy to pick up again, just a click through download.com, but others I was using older freeware versions instead of new trial versions so I could have full functionality. Those are harder to come by, and usually require going through a seedy website and praying you come out of it without a virus (much like picking up a hooker on Van Buren). And I didn't want to waste the time doing that on the Laptop since the crash, coupled with heat issues had cemented in my mind that I needed to get a new PC anyway.
I ended up getting a new PC from NewEgg. If you have read my page in that past, you know that I like them so much I am practically a spokesman for the company. The last time I bought a computer I stuck with a name I knew. This time, before I even went to shop for one, I knew that I was going to try a PC built specifically for gaming. Either a CyberPower PC or an iBuyPower machine. Both of these have an entry level price that is roughly the same as an entry level eMachine or a Compaq, but they are (theoretically) built for gaming. The one I chose this time was a CyberPower PC.
The CyberPower was my second choice. I had actually already put one from iBuyPower into my cart and went through the payment process, but due to a changing zip code my order was put on hold. Three days later it still hadn't processed so I cancelled the order. By that time the machine that I wanted had sold out, so I went to plan b. The CyberPower machine I chose came with a 2.9ghz processor, 4gigs of RAM (upgradeable to 16gigs), a 1gig GeForce 9500 video card, and integrated 5.1 surround. I ordered an additional 4 gigs of RAM (to upgrade myself) and got the whole setup for just a shade over 600 dollars. And boy am I ever glad that I chose to go with a name I hadn't heard of.
The tower is huge, but that is pretty much my only complaint about the system. When I fired it up for the first time and got to the desktop I was ecstatic to see that there were no icons there. The machine came equipped with 64bit Windows Vista and nothing else! This was a huge plus for me, though I could see how it could be a minus for someone who actually uses anti-virus software. The thing about anti-virus software is that it has always bogged down my machine so much that the tiny amount of security it provided (let's face it, I have been on the internet for 15 years, I know how to keep myself virus free) isn't worth sacrificing the performance. Honestly, I think the anti-virus software does more to harm the system by constantly running and updating, keeping you from running programs -even windows update won't run under some of the bigger names-, than the actual viruses they are meant to protect against. In addition to the lack of anti-virus, there were also no trial software offers for AoL, NetZero, MSN, and all that other crap that usually clutters up a new machine. In fact while looking through the start menu, the only trial offer I could find was Microsoft Office. There were only a recycle bin and two other icons on the desktop, neither of which necessarily needed to be removed. The lack of third party software is why my next PC purchase will definitely be from these guys.
I do have one petty bitch about the machine though. For reasons unknown the 5.1 surround that it comes pre-installed with has all of the tools turned off. Instead of having an audio manager with an equalizer and such, the only thing it shows when you click on the "Via HD Audio Deck" is the ability to change the input/output assignments of the audio ports on the tower. It took me a lot of toying around to find out that if you go into the control panel and get into the sounds settings, under the advanced tab there is an equalizer option (which has presets that sound so terrible and tinny that they are of 0 use to anyone) which I was able to use to get it to sound great -but not through headphones. I am not sure if the headphone issue is my hardware or a software issue though, so I will hold back my tirade on that bit of it for now.
So in order to set the equalizer, I needed to get some samples of different types of music onto the machine. I have an external hard drive networked here in the, well, let's call it an office, that all the pcs have access to, so I copied the library here. I started tweaking the settings while playing different styles of music until I got to where it sounded great for the Heroic Power Metal that I seem to listen to the most, and it still sounds good for the more popular Rock and Metal that makes up the rest of the library.
While I was copying the entire library from the external drive, I realized that my taste in music has changed quite a bit over the last decade. I used to listen to almost exclusively death/thrash metal, but that has been slowly evolving to where I now enjoy melodic stuff more. I still like the music to be in-your-face and pounding, but with death metal getting ever more bestial in the lyrics (the sound, not the content), and me with no particular desire to listen to the Cookie Monster doing death metal, I have been gravitating to the other type of music that seems so prevalent now: Heavy Music with a woman doing harmony over it.
I heard a song by the band Luna Mortis a couple of months ago, but wasn't able to find the album online until recently. This is just the type of thing I am talking about, but with a twist. The music is heavy, but the vocals on this one range from beautiful and melodic to just a hint of the cookie monster-esque death metal that turned me off to death metal in the first place. For unknown reasons it doesn't bother me in these songs, perhaps since there is actual singing to compliment it? That well could be, as I also like the band Bullet For My Valentine, who also have normal vocals mixed in with the Jaba the Hut chorus. Here is a sample of the song "Ruin" from Luna Mortis' album The Absence
I chose that song because it was a good example of the mix of lyrical styles, not because it is one of the better songs on the album. In fact, I think it is probably one of my least favorite songs, but it typifies the style in a small sample far better than any of the other songs do. Now even I can't listen to this style of music exclusively, but mixed in with a library old Metallica, Megadeth, Pantera, and newer, popular rock and metal, it fits nicely.
And speaking of newer, popular rock, I can't stop listening to Halestorm, even though every time I find myself enjoying it I want to kick my own ass. They are another band with a female vocalist, but very clearly trying desperately to be mainstream. All of the songs are three minutes long, they all have very easy to remember hooks for the chorus, and let's face it, if you have a penis, you can't help but want to bang the singer. She does display some amazing vocals in a couple of the songs, but every time I started trying to find an example of that to sample, I just ended up scrapping it and going back to this:
That is the beginning of I Get Off from their self-titled album. I don't know what it is that keeps me coming back to that song. Perhaps it is the sexual deviant in me finding some comfort in a woman finally admitting that she knows that she is being watched when she is undressing near the window, and that she is doing it exactly for that reason. Which is great for me, since it just gives me a visual of a sexy, sultry woman in a teddy, posing near a window. But I could certainly see how a more delusional sexual deviant could take this as license to stop jerking off outside her window and go in to get him some. I have no doubt in my mind that within a year this song will be cited as a mitigating factor for some pervert raping someone. Just hopefully not Lzzy Hale, 'cause the visual doesn't
Archives
June 2005 July 2005 August 2005 September 2005 October 2005 November 2005 December 2005 January 2006 February 2006 March 2006 April 2006 May 2006 June 2006 July 2006 August 2006 September 2006 October 2006 November 2006 December 2006 January 2007 February 2007 March 2007 April 2007 May 2007 July 2007 October 2007 December 2007 February 2008 August 2008 January 2009 February 2009 March 2009 April 2009 July 2009 August 2009 October 2009 November 2009
Site design was stolen directly from Blackchampagne.