Site Links:
Arthur Witles
Who I am - Site info
Music Lost to History Archive
Horoscope Archive
Original Poetry
Pre-Blogger Archives
Stuff I Made
Vacation Photos
My coming of age story.
Programs I use for the site
Email me
Latest Humorous T-shirt Slogan:
"You Wish!"
This one has to be taken in context to be appreciated. The girl wearing this belly shirt was maybe 5'0" tall, with a muffin top going on, despite the fact that she was clearly in her third trimester of pregnancy. In addition she was wearing a thong that came up past her low-rise jeans and pushed her muffin top down over the edge to really emphasize the roll. I'm not in perfect shape so I don't expect that others should be, but when you are wearing that shirt, along with the rest of the outfit, you open yourself to scrutiny (and perhaps random looks of horror).
It's fun to hate:
The Soccer Moms who insist that they drive gas-guzzling SUV's for the safety of their children despite the fact that they are 6 times more likely to be in a rollover
accident than any other vehicle. It's like beating your child unconscious with the butt of your gun so that he will remain on the floor, thus making him less likely
to be hit by a random bullet coming through the front window.
When Shadowtwin reigns supreme:
There will be mandatory, passive birth control required to participate in any form of government assistance. If you can't afford to raise your child on your own we are here
to help you, but we must first make sure that your reproductive organs are adequately contained. If you don't like that policy all you have to do is support your kids your
damn self!
Vote Shadowtwin!
Your Horoscope:
 Sagitarius: 11/22-12/21
A typographical error in your Church's newsletter will lead to you performing sex acts on dozens of anonymous strangers in your pursuit of "oral highground."
 Capricorn: 12/22-1/19
The stars did recently tell your wife to "listen to her heart" regarding whether or not she should leave you. The stars did not intend for you to listen to her heart. But once you used that bonesaw on her sternum (not trusting the stethoscope which just responded with a cryptic thumping sound), we're pretty sure she made up her mind anyway.
 Aquarius: 1/20-2/18
The stars would like to apologize for stating in their last prophecy, "Be wary of the stranger you meet at beach this weekend. The stars aren't sure why, but they don't trust him." Through a cosmic hiccup, that information was supposed to be released this month. The August prophecy should have read, "A dark and handsome stranger will approach you on the beach, profess his love for you, and sweep you away for a jetset marriage. After which you will lead a long, happy, prosperous, healthy life as the Queen of a small island nation." We apologize for any inconvenience this error may have caused.
 Pisces: 2/19-3/20
Your new stopwatch will allow you to time how long you can hold your breath underwater down to the thousandth of a second. Unfortunately, poor planning will mean that you are not able to actually share the information with anyone.
 Aries: 3/21-4/19
Your innovative new device for beauticians to use while giving pedicures can be wildly successful and make you quite wealthy IF you change the name. Trust us, no one is going to buy a "Ped-O-File".
 Taurus: 4/20-5/20
Your Mother always told you to wear clean underwear just in case there was an accident and paramadics had to see them. But as you board that plane today, the stars want you to know that you needn't worry about it. The debris field will be more than 8 square miles, making it impossible to find most human remains. Not to mention that the ensuing fire burned so hot that it disintegrated not only all fabric, but most of the thin metals aboard as well.
 Gemini: 5/21-6/21
You just had to get that genital piercing, didn't you? The stars tried to warn you not to, but you went ahead and did it anyway... Now all your worst fears will come to bear when, at a campground this weekend, you run afoul of this guy:

 Cancer: 6/22-7/22
The less traveled by areas of the Grand Canyon's north rim offer some of the most breathtaking views of this natural wonder. You will soon find out they also include some of the worst footings and none of the handrails. They do, however, provide equally awe-inspiring, terminal velocity impacts.
 Leo: 7/23-8/22
The stars heard your pleas, begging for someone who you could share your love with and embrace for the rest of your life. If you are still single, throw your arms around the closest person to you at 3:44pm GMT on Dcember 9th -That'll be the one. Trust us, you won't have time to be picky...
 Virgo: 8/23-9/22
The stars have piled up most of your things on the front porch. You can stay at a friend's house, but you aren't coming back home until you admit what you did and apologize. The stars' Mother was right about you... (you must have really pissed them off; the stars were in tears while they told me this)
 Libra: 9/23-10/22
The stars have been doing a little thinking and a lot of math. The population of planet earth is roughly 6,796,590,704. That means that roughly 566,382,558 people share each astrological sign. About 18,620,796 have the same birthday. Based on average life expectancy as many as 248,277 people were born on the same day, in the same year, for every zodiac sign. How can one statement possibly predict the future of all of them? Ehh, fuck it. "A full moon while Venus is rising is an omen of good things to come."
 Scorpio: 10/23-11/21
They say you never know how you are going to react to a crisis. After a home invasion this weekend you will: You will scream, "Do whatever you want to my wife, but leave me alone!" You will then create a distraction by throwing your newborn at the assailant as you dive through the window to safety. Now you know.
Music lost to history:
Aerosmith - Dream On When I started doing these, I could never have imagined that I would be putting an Aerosmith song here. Since I was born in 1974, this song is well before my generation. It was recorded in 1972 and released in 1983 on Aerosmith's Self-Titled Album, but to read the information on it at Wikipedia most of us would become familiar with it from a re-release in 1976.
Like most of the music being released in the late 60's/early 70's that was pushing the rock-n-roll envelope, Dream
On relies heavily on solid composition and and melody. Before the era of the modern effects processor, these bands
had no distortion to hide behind (or very little), and synthesized instruments hadn't yet made their way into music. In
that way the music always sounds more raw to us today because, quite simply, it was. While it seems laughable to think
about today, music like this was so far removed from the bubble-gum pop of the 50's that it still wasn't accepted into the
mainstream. As the baby-boomers became the target demographic, the rock-n-roll movement really started to pick up speed,
with bands like Led Zeppelin and Aerosmith clearing the path for the much darker and heavier bands like Black
Sabbath.
While I (and most of my generation) are probably far more familiar with the Aerosmith of the late 80's and early 90's, the
reason this song makes it onto my MLtH page comes down to one thing: Age. Not necessarily the age of the song; In fact,
as I sat down to do the research for this today, I had no idea when it was released, but would have guessed (closely) the
mid 70's. Tyler was born March 26, 1948, meaning that this song was written when he was only 24 years old. I'm not sure
why, but I have always thought this song was pretty amazing given his age at composition. I suppose it is human nature to
wax poetic about the days of yore and the imminent passage of time, but the melody sets a mood that makes you feel it
right along with him. As the song nears the end and his lyrics become more more frenzied, you can almost feel the pain
(longing?) in his voice. Listen to it with headphones and no distraction sometime, you'll see what I mean.
I wrote a short bit some time ago about Kelly Sweet's cover of this
song (see the video on Youtube). While I have since gotten over
the initial hatred I felt towards the cover of the song, I still just can't like it. The words are there; she hits the
notes; but I just can't hear it in her voice. As if there is somthing very personal about the song and Tyler's
deliverance of the lyrics that just can't be duplicated. At least to me.
That said, I have heard Aerosmith doing the song with an orchestra, and it also seems to lack the passion of the original.
So perhaps the thing that I like so much about it is the under-produced, raw sound of it, or it may be that I am still
hearing it through the ears of that impressionable youth that heard if for the first time in a dusty old Van with my Uncle
Art. Either way, it seems it is Lost to History.
I Can't Believe it's Not Porn!
WhorePresents.comYep, it's not porn. It's not a site with gifts for sale either, which is probably a good thing since I can't imagine that any woman would be at all flattered to get a gift -no matter how nice- in a box that says "Whore Presents.com" on it.
Daily Reading:
BlackChampagne
Magazine Man
Shane Nickerson
Wil Wheaton
Boners
Hoyazo's Poker Blog
My reading list changes from time to time, and there are many sites that I visit that are not on the list.
They are listed in the order that I visit them, enjoy!
![]()
Shower faucets aren't really figner tight
The problem with the shower is a bit odd, really. For reasons unknown the hot water side will gain and lose pressure seemingly at random. It could go for 2 weeks without having a problem, it could go for 2 weeks without working properly. I had tried disconnecting the hot water line and just blowing water through it without success, so I needed to try something else. The plan was to try to just pull the control lever and clean the fittings inside of that; possibly replace a couple of the rubber seats. Of course this all went to hell the second I touched it.
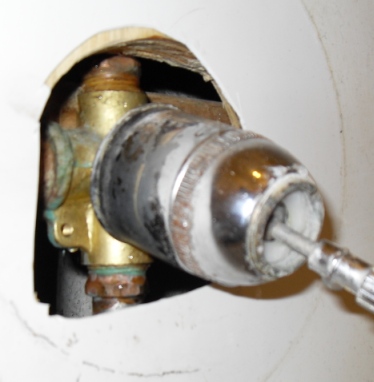 You can see that little bastard here. I have taken off the trim already, and started trying to take the ring that holds the faucet together off. Up to this point it hadn't been working -which is to say that it wouldn't move a bit- so I knew it was only a matter of time before this minor repair became a major headache. You can actually tell from the photo that the whole faucet has been moving as I have been trying to apply gentle and even force with a wrench, you can also tell by the angle it is currently at that is hasn't been working to loosen the retaining ring at all. I already have the water off at this point, and I have no intention of stopping until I get the damn thing working again, for better or worse, so I grabbed the camera to document the
  There are lots of instructional videos online showing just how to do this (take the ring off and replace the seats and springs, that is), and in all of the videos these fittings are barely finger tight, and the entire operation takes about two minutes. Of course in the real world you will be there with a pipe wrench -actually leaning on it for additional torque- and the fucker is going to break. You'll know you've reached this point when the water starts pouring out of the handle as seen here. Pretty much as expected I broke one of the lines on the back of the faucet well before the retaining ring broke free. I want to point out the quality of the image though: you are seeing a version that is cropped pretty heavily and reduced to 20% of the original size, and still those little water droplets just hang there, as if frozen in time... It's a good thing I had the camera handy, eh?
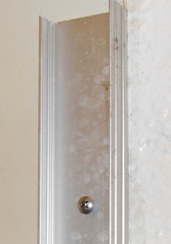 Another thing that all the instructional videos I saw online had in common was that there was always ready and easy access to all of the plumbing. That's nice for making a video, but a house generally tends to have most of the plumbing fixtures hidden away in walls. They are much more difficult to get at there, but they also aren't nearly as much of an eyesore. My house is one that has said plumbing connections hidden away, so there was much work to be done. The wall behind the shower (the one on the outside of the bathroom) is about 18 inches of solid adobe. There is an access panel that goes about halfway up the back of the bathtub, but no reasonable way to access the faucet from there. You can reach the water supply lines and that is about it. That meant I had to do all the work from the front (and theoretically finished) side. First I had to remove the sliding glass doors that I put in when I initially remodeled the bathroom a few years back. That is easy enough; the top bar is held in place only by gravity, and each end is easily pulled off by removing three screws and cutting the bead of silicone running along the edges.
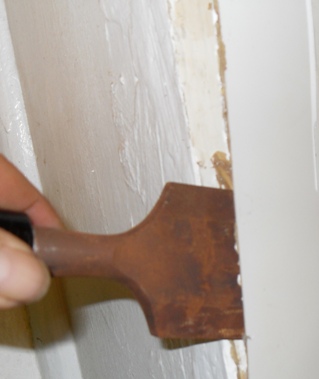 The walls of my bathtub/shower are covered with a 5-piece pre-molded surround. This also went in when I did the bathroom remodel. Previously there had been 8"x8" ceramic tiles that ran only about 30 inches up the wall. Water had gotten between and behind them and done some horrible damage to the adobe. Water is the #1 enemy of any structure, but in adobe that is tenfold: water + packed dirt = mud. The goal was now to try to remove this piece of the surround without doing extensive damage to it. I expected I was probably not going to be able to do it without getting any cracks in it, but I was hoping that I would be able to reuse it; I really don't want to have to replace the entire surround. So with a chisel and some finesse, off to work I go.
 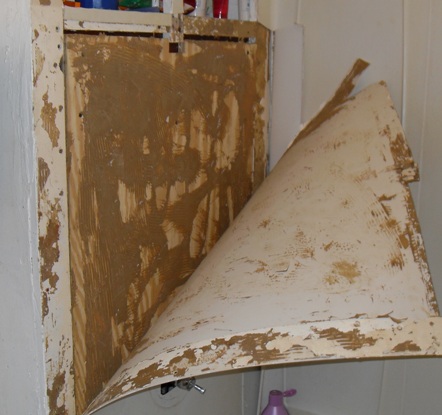 Now having mentioned the prior problems I had with water getting behind the shower enclosure, I knew that I took extra effort to make sure that it wouldn't happen again. I remember being pretty liberal with the liquid nails on the back of all of the panels, then going batshit with the silicone near the top and edges, but even I was surprised to see just how much glue I had holding this thing up. I mean holy mother-loving shitballs that is a lot of glue! I was taking my time here to try to do this slowly, peeling it back a little at a time, trying not to let it crease so that it wouldn't crack. You can see one large crack near the top of the picture but thankfully that is behind an overlap when installed.
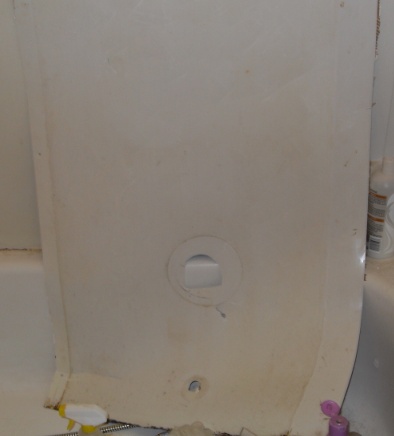 I managed to get it off in one piece, with only a minimum of damage. Near the bottom left you can see a crease which would end up cracking, but with a little bit of caulking it will be just fine. If I was doing this for someone else I would certainly replace this whole sheet (I should also point out that there is absolutely no way I would do this for someone else anyway, so that example probably doesn't mean much), but since it is my house and I don't mind a few imperfections this is good enough for me. I would move this out of here and lay it flat on the floor after I saw that first crease form, and that was the only visible crack that formed during the process.
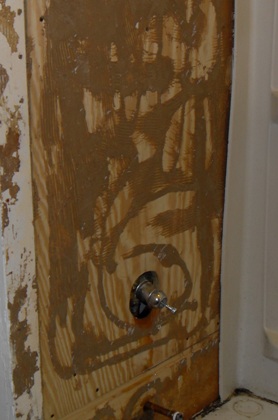 Getting the plastic surround off was really the only part I was dreading. Once I got down to the lumber and plumbing I was a lot more confident that I could do this without too much of a headache. The plywood that you see in the picture here was all added when I remodeled the bathroom. There had been a couple of 1"x4"'s behind this previously that were holding up some particle board, and it had all rotted through. Plywood is not an ideal structural material, but in this application the only thing it is actually holding up is the thin plastic shower surround, so there isn't any real weight to it, and it needed to be smooth. This whole thing came off easily, there are about 10 screws holding it up (they can be seen as little black dots throughout). A couple of them had gotten hidden behind that ridiculous mass of glue, but I was able to get them all out pretty easily to get at the plumbing.
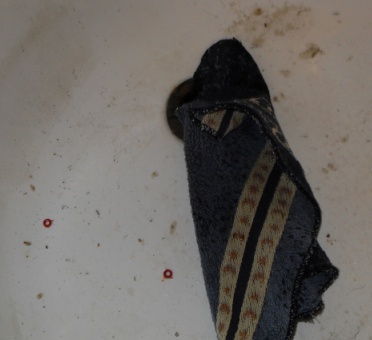 The cup that I had been holing all of my screws and other hardware in got knocked over into the tub. As I was picking the parts up, I snapped this picture. If you are ever working on a sink or bathtub, make sure you plug the drain. I just threw a handy washcloth in there, and as you can see there are still a couple of little red washers in there from where the cup tipped. I'm sure that the sliding glass door frame would go back up just fine without them, but the less crap you get in your drain the better. The last thing you want is to have to tear out your drain as well.
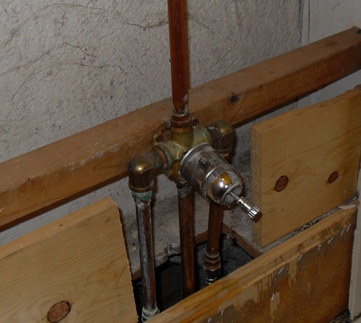 Here we see the faucet assembly. The board that it is mounted to is another addition I had to put in there, the old faucet had been simply held in by the pipes and I needed to change that. Also the little pieces of one inch lumber on the sides were added to give me a couple more screw points for the plywood front. Down at the bottom you can see a piece of lumber with a square cut out if it, that exterior access is just below that. As you can imagine it would be impossible to get a screwdriver all the way up to the faucet mounting screws from there. I am to the easy part at last!
 This shot is just to get a good look at the copper and bronze fittings. You can see a lot of discoloration on them right near the tips, and the hot water side has some running the length of the pipe, but being copper and bronze these are still in pretty good condition and don't really need to be replaced. Those bronze elbows go 5-8 bucks each (depending on the store) and sweated copper pipe can last a hundred years easy, so there is really no need to replace it.
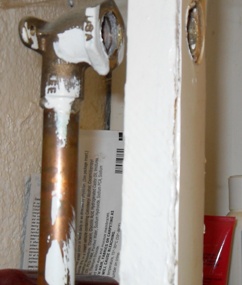 Remember to disconnect the shower head assembly before you start trying to remove this line. I actually neglected to do that during the remodel and was forced to replace the entire line after I applied about three ass tons of force and creased the copper. This top piece is usually in a finished chrome so be careful not to damage it if you are going to reuse it. I find that you can usually stick a screwdriver inside of it and use it for leverage (the top piece that goes into the shower should be bent so this works nicely).
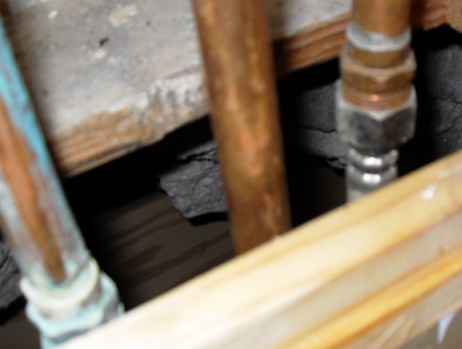 Disconnect the water supply. I am going to point out that this is one area where I probably went far astray from building code. I really shouldn't have the flex lines you see there in this application. I should be using compression fittings for this (the ones with the nut that crimps down on the pipe to tighten it) and I think building code would dictate that since this is inside a wall you shouldn't have this type of connector (I can't swear to that) but when I put this thing in I knew I was going to have to replace it eventually, and using the flex lines meant I would be able to put just about any faucet back in here, where if I had gone with a solid line I would have had to do a lot of cutting and soldering if it didn't all line up. I do have access to these lines from the outside (note the hole in the block in the back of the picture) and since I am replacing the faucet now I sure am glad I did it this way.
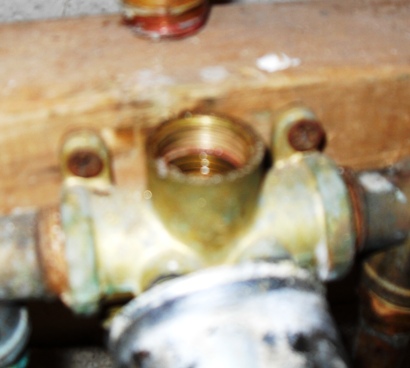 Once all the other water lines are disconnected, there are only a couple of screws holding the faucet up. These ones were rusty as hell, but they came right out.
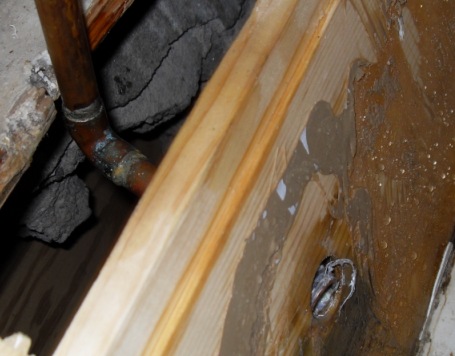 Then to pull the spout out... Unfortunately the length of this piece of pipe wasn't something that I had a great deal of control over. It had to be long enough that the spout would sit snugly against the wall when the whole thing is assemble, and as it turns out that is about an inch longer than the space I had available to remove it. As you can see I actually had to notch a piece of the lumber out in the back to get this thing pulled out. Again, the plan is to reuse all of this, so I didn't want to just cut the pipe.
 I wanted to take a shot of this one to show the actual end of the pipe. While it looks extremely corroded, you can see that the threads are still in excellent condition. There was clearly a leak at some point, or it could be from condensation, these lines are not in an insulated area, but there is no damage to any of the pipes or fittings beyond superficial. The flux was still clean and unbroken, there were no bends, kinks, or crimps. I'm sure your helpful hardware store attendant would probably give you the opposite advice, and equally as sure that a general contractor would point to the corrosion as evidence of a need to replace all the plumbing in the house, but in the real world there is no need to throw money at it just because the faucet was faulty.
 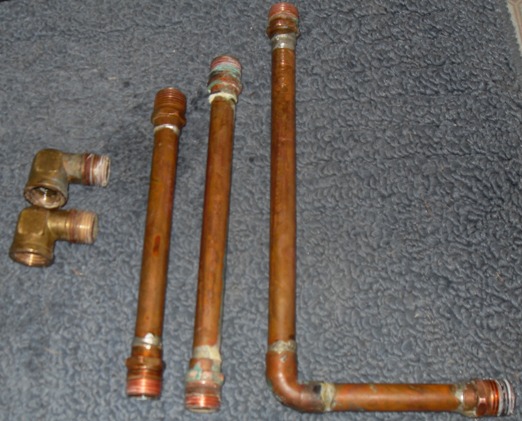 Here are those pieces again, cleaned up just a bit. Just hit them with a wire brush to get rid of any loose debris. The only concern is anything on the threads that might keep the teflon tape from making a seal, remnants of old teflon tape doesn't fall into that category. Also I didn't clean the threads all the way to the nut simply because it's not necessary to screw them any tighter than a couple of turns. Again, a contractor may offer different advice, but we are looking at real world application. Just as there is no need to waste a lot of money, there is also no need to waste a lot of time, unless you happen to be paying yourself by the hour for this repair, if that's the case, by all means, clean those pipes up like new!
  Here is the whole assembly reattached to the new faucet. You can see that the teflon tape hid all those imperfections around the threads anyway. A couple things to note if you are using a single faucet handle like this: The first is to make sure that you have the correct side up. It would be entirely possible to install this thing upside down. As I'm thinking about it, it might still work upside down, but better safe than sorry. The second is to make sure you get the pipes oriented correctly. I could probably still turn each of those pipes a quarter turn with a wrench, give or take, but since they have to line up, snug (with a wrench) is all you need; if you get stuck and are force to back it out, remove the pipe, retape it, and do it again.
 It all goes back together just the way it came apart. Just hook it all back up and, with any luck, there won't be any leaks. Make sure to test it for leaks before you put the whole wall back together. I have the wallboard only connected by three screws and the laminate cover not glued in place so that I can check again in a couple days to make sure the temperature changes don't cause it to start leaking.
And that is about as far from the three finger-tightened screw walktrhoughs that you are going to find.
Archives
June 2005 July 2005 August 2005 September 2005 October 2005 November 2005 December 2005 January 2006 February 2006 March 2006 April 2006 May 2006 June 2006 July 2006 August 2006 September 2006 October 2006 November 2006 December 2006 January 2007 February 2007 March 2007 April 2007 May 2007 July 2007 October 2007 December 2007 February 2008 August 2008 January 2009 February 2009 March 2009 April 2009 July 2009 August 2009 October 2009 November 2009
Site design was stolen directly from Blackchampagne.